miércoles, 9 de diciembre de 2015

Azure SQL Geo-Replication Change Role Procedure (UPDATE)

In this entry Azure SQL Geo-Replication Change Role Procedure I explained how to proceed in a Azure SQL disaster whit the Geo-Replication active.

Well, this procedure has changed. Now there is a new and simplier way to initiate a DataBase failover in the Azure Ibiza Portal.

Browse to SQL Databases and select the Primary Database.


Browse to All Settings and then to Geo-Replication


Select the Secondary DataBase and clic on the FailOver option in the next slide.


Accept in the next prompt if you are sure you want to change the order of the DataBase (if we are in a critical situation, we are sure of that)


The DataBases status will change to Pending for a while.


We only have to wait until the FailOver ends and we will have the order of our DataBases changed.


The main advantage of this procedure is that we don´t lost the Geo-Replicaton configuration and we can switch between the DataBases all the times we need (but it is better not to need it ever)


miércoles, 21 de octubre de 2015

Azure SQL Geo-Replication Change Role Procedure

In the case of one Azure SQL Database gets degraded, if we have configured the Geo-Replication as shown in this post Azure SQL Geo-Replication Configuration, we can change the role of the replicated DB with this procedure and use it as the main DB.

1.  For activating the Secondary DB of the Geo-Replication, go to SQL databases in Ibiza Portal.


     2. Open the Primary DB and go to Geo-Replication

  
       3. On the Secondary DB, clic the 3 points on the right and select Stop Now


      4. One message appears indicating that the replication will stop and the Secondary DB will be converted in a stand-alone DB, press YES


      5. Using the command Get-AzureSqlDatabaseCopy we can verify the non-replicated status of the DB, it must not return any information.


Azure SQL Geo-Replication Configuration


We can use the Azure SQL Geo-Replication feature as DB disaster recovery plan. We make a copy any DB in another Azure Region.

1. For activating DB Geo-Replication, go to SQL databases in Ibiza Portal.


2. Select the DB > All Settings > Geo-Replication


3. Choose the Target Region where the DB will be replicated (the best option is to select the recommended one)


4. Create a new DB server filling the name of the server, the admin and the password. Select to create V12 server, and check the option to allow Azure services to access server, and press OK.


5. After the creation of the new server, in the “Create secondary” slide appears the new created server. In the lower left corner, press CREATE.


6. In the Geo-Replication slide appears the new Secondary server initializing.


7. When the process is finished, the status of the new replication DB appears as Non-Readable.


8. Now there are two DB with the same name in two different servers, each one in one Location.


9. In the configuration of both DB, appears the corresponding Geo-Replication role.


10. To verify the status of the copy between both DB, use the command Get-AzureSqlDatabaseCopy


11. Now that we have configured the Geo-Replication, in disaster case we can activate the replicated DB following the instructions in this post Azure SQL Geo-Replication Change Role Procedure

miércoles, 30 de septiembre de 2015

Monitoring a Virtual Machine in Azure

This is my first entry in English so I would like to apologize upfront if there are any language mistakes. If you find anything that needs correction, please feel free to contact me and I will gladly make the changes based on your suggestions


In the same way we monitor our physical servers, it is necessary to monitor our VM.

Now that we have a Virtual Machin in Azure, I will explain how to enable and configure how to monitor it.

For that, I will use the new Azure Portal, Ibiza. It stills in Preview, but it is functional.

This is the URL


To configure the monitoring it is necessary an Azure Storage Account where the monitor data will be stored, so the first step is to create a Storage Account in the same region that our VM is.
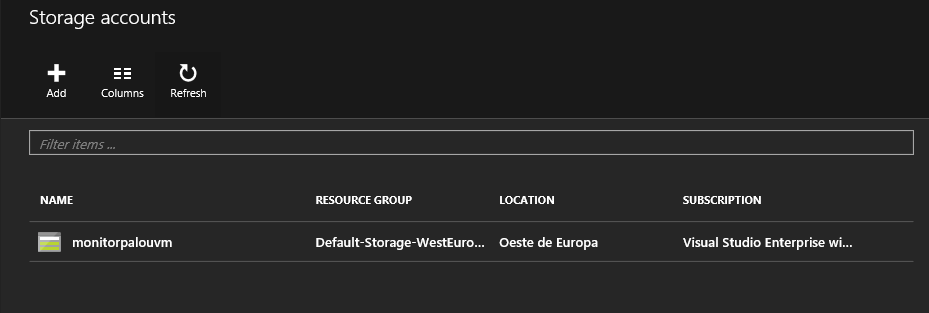
Go to Browse and select Storage Accounts. You can see there is another section called Storage Accounts (Classic). There you can find the Storages Accounts created in the old Portal.


Once in the Storage Accounts section, press ADD


A new slide appears. Here we assign a name to the Storage Account and select the Resource Group and the Location (remember, the Location must be the same where the VM is).


In the upper right corner, with the BELL symbol, you can watch the progress of the deployment.


When the deployment is finished, just refresh with the circular arrow


We can configure the VM monitoring yet. In our case, we will find it in Virtual Machines (classic) because it was created in the old Portal.


Click on the VM and a slide appears. Here we can see the all the data about the VM and another slide with the settings. In the lower part there is a tile called Monitoring where there is a message offering to turn on the diagnostics, but we are going to use the Diagnostics menu item in the right.


In the new slide, press ON to enable the diagnostics options. The first thing is to select the Storage Account configured previusly.


And then, select the parameters we want to monitor.  In this case, we are not going to monitor .NET, SQL or IIS. But remember to check the Boot Diagnostics. And when you have finished of choice the options you want to monitor, press SAVE.


Now we can start the VM and wait for the data to see the charts change.


We can add some alerts now. They are useful to be aware of some important metrics of our VM. Press on Alert Rules and then Add Alert.


In this example, it will send an email to the EMAIL@EMAIL.COM address when the percentage of memory used is greather than 80% for 5 minutes.


martes, 18 de agosto de 2015

Importar máquina virtual a Azure

En este post vimos cómo crear una máquina virtual con Hyper-V, ahora vamos a subirla a Azure, el servicio Cloud de Microsoft.
Para ello, debemos contar con una subscripción, si no tenemos una, podemos hacer una de prueba en este link https://azure.microsoft.com/es-es/pricing/free-trial/

1. Una vez que tengamos nuestra subscripción, tenemos que instalar la consola de PowerShell de Azure, aquí se pueden encontrar las instrucciones para instalarla y conectarse a nuestra subscripción https://azure.microsoft.com/en-us/documentation/articles/powershell-install-configure/


2. Lo primero que tenemos que hacer es configurar el almacenamiento donde irá el disco duro de nuestra máquina virtual.
 New-AzureStorageAccount -StorageAccountName “teststorage1”  -label “test-storage1” -Location “West Europe” 


3. Para ver los datos de nuestro nuevo almacenamiento
Get-AzureStorageAccount


4. Por defecto, el Escritorio Remoto de nuestra máquina virtual en Hyper-V estará habilitado, pero no permitido a nivel de Firewall, por lo que es imprescindible hacerlo antes del siguiente paso. Hay que hacerlo tanto para redes públicas como para redes privadas.

5. Necesitamos convertir nuestro disco VHDX en VHD para poder subirlo a Azure
Convert-VHD -Path  “C:\Users\Public\Documents\Hyper-V\Virtual Hard Disks\w10_x86.vhdx” -DestinationPath c:\temp\w10x86.vhd   (la carpeta c:\temp tiene que estar creada anteriormente)


6. Ya podemos subir el disco duro de nuestra máquina virtual al almacenamiento de Azure.
Add-AzureVhd -Destination https://teststorage1.blob.core.windows.net/vhdstore/win10.vhd -LocalFilePath C:\temp\w10x86.vhd


7. Ahora nos vamos al portal de gestión de Azure https://manage.windowsazure.com y accedemos a la opción de Virtual Machines. Le damos a Create a Disk. 


8. Especificamos un nombre para el disco, le damos al icono de la carpeta para explorar el almacenamiento


9. Veremos el almacenamiento donde hemos subido el disco de la máquina virtual, lo seleccionamos y damos a Open.


10. Hay que marcar la casilla que indica que el disco duro virtual contiene un Sistema Operativo y seleccionar Windows 


11. Y ya tenemos el VHD preparado para nuestra máquina virtual.


12. En la parte de Instances, le damos a Create a Virtual Machine


13. Seleccionamos las opciones COMPUTE >> VIRTUAL MACHINE >> FROM GALLERY


14. En el asistente, en la parte inferior izquierda, seleccionamos MY DISKS y elegimos el VHD que hemos subido.


15. Le asignamos un nombre y unas características (estas dependen del precio que se quiera pagar). 


16. Creamos un nuevo servicio Cloud y le ponemos el nombre y los puertos por los que nos conectaremos a la máquina virtual por RDP y por PowerShell.


17. Indicamos si queremos algún software extra en nuestra VM…


18. Y esperamos mientras la VM se aprovisiona.


19. Cuando indique que la VM está Running, ya podremos conectarnos a ella a través de RDP.


20. Pulsamos sobre el icono CONNECT y el navegador nos pedirá si queremos abrir o guardar el archivo con extensión .rdp.


21. Cuando abramos dicho archivo, iniciará la conexión de Terminal Server y nos pedirá el usuario y contraseña de la máquina virtual (recordad que en este caso es el que configuramos cuando creamos la máquina virtual en Hyper-V)


22. Nos saldrá la alerta de seguridad correspondiente al certificado de la máquina, ya que es autofirmado, aceptamos…


23. Y estaremos conectados a nuestra máquina Windows 10 en Azure.